10 DIY Pin Board Ideas


Integrating personalized organizational surfaces into a home workspace or living area creates a highly functional and visually appealing environment. A DIY pin board serves as a centralized hub to gather notes, display family photos, track weekly schedules, and showcase inspiring design ideas. This detailed guide explores how to construct, frame, and customize various pin board designs using simple, accessible crafting techniques. Readers will learn how to work with diverse backing materials, including cork, acoustical felt, dense foam, and upcycled materials, to assemble a durable and high-quality display. This creative project elevates standard home decor by combining daily utility with customized textures, fabrics, and frame styles tailored to your space. Whether you need a small, sleek board for a minimalist office desk or a sprawling fabric-covered installation for a bustling kitchen, these ideas offer practical and realistic solutions. By understanding the core principles of backing thickness, secure mounting, and fabric tension, you can easily turn a plain wall into an organized focal point of creative ideas. This article provides a comprehensive tutorial for crafting ten distinct boards that will enhance your spatial planning and decoration.
Why Handmade Memo Boards are Trending in Modern Spaces
Custom organizational boards have captured the attention of design enthusiasts on visual platforms, establishing themselves as prominent Pinterest ideas for modern interior styling. This surge in popularity is driven by the practical value of keeping countertops clear of paper clutter, paired with the desire for highly personalized office aesthetics. Traditional, mass-produced office bulletin boards often feature basic aluminum frames and thin, fragile cork that crumbles over time, which detracts from a carefully styled room. In contrast, a handmade board offers immense DIY appeal, allowing you to select fabrics, colors, and textures that integrate seamlessly with your existing furniture. For beginners, assembling a custom memo board is an exceptionally accessible easy project that requires no expensive specialized power tools or advanced carpentry skills. These projects allow individuals to experiment with textile wrapping, paint detailing, and geometric panel layouts to make a unique functional statement. By controlling the exact dimensions, framing profiles, and hanging mechanisms, these creations transition from basic office utilities into stylish, high-impact features that enhance the warmth and organization of any residential or commercial room.
Materials and Structural Selection for Bulletin Board Projects
Fabricating a durable and functional pin board requires precise planning, correct material selection, and gathering the proper utility tools before beginning assembly. The most critical component of your board is the backing material, which must be thick and dense enough to hold standard push pins securely without allowing them to poke through to your drywall. Ideal core materials include half-inch thick self-healing cork sheets, high-density fiberboard, rigid foam insulation panels, or thick polyester acoustic felt tiles. To frame and assemble your selected core, you will need sturdy backing boards like thin plywood or hardboard, heavy-duty spray adhesive, hot glue, framing nails, and hanging hardware. Essential crafting tools include a sharp utility knife with replacement blades, a metal straightedge, a staple gun with short staples, a tape measure, and a level. Proper planning involves measuring your wall space precisely to determine whether a horizontal or vertical orientation fits best, while considering the weight of the finished unit. Choosing lightweight materials like foam or felt ensures that larger, oversized boards remain easy to mount securely without requiring heavy-duty drywall anchors.
Idea 1: The Fabric-Wrapped Ribbon Lattice Board
Concept and Spatial Layout
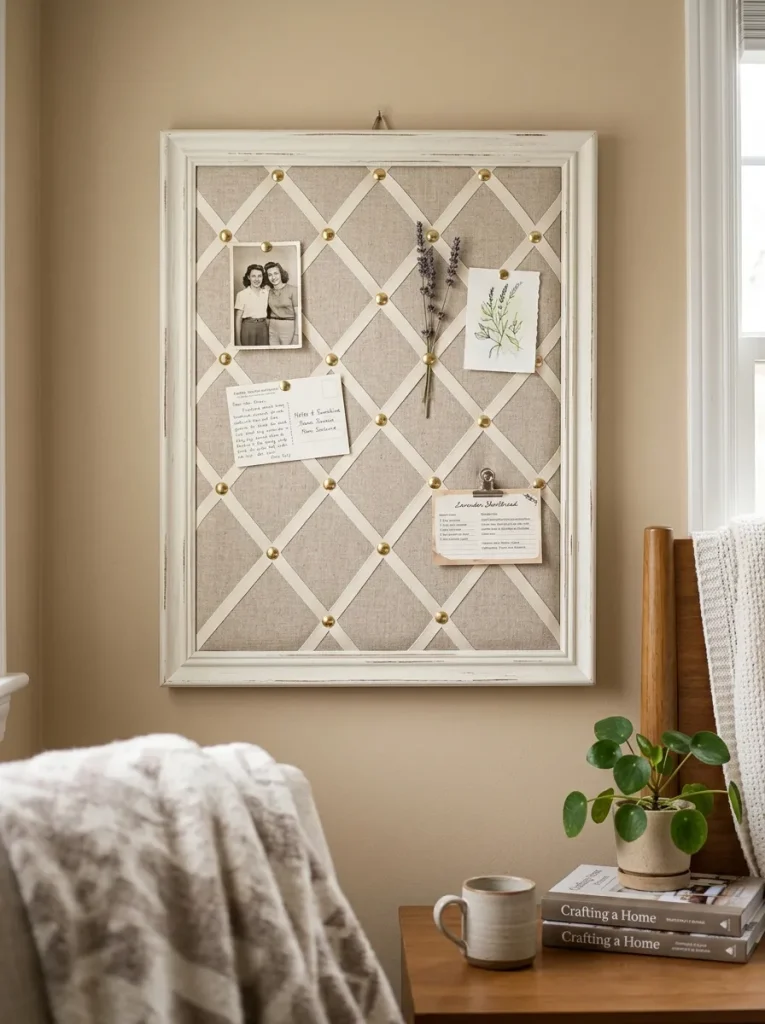
The fabric-wrapped ribbon lattice board combines classic elegance with dual-functional storage by using intersecting ribbon bands to hold photos without needing pins. This design concept wraps a padded cork or foam core in a soft, solid-colored linen or cotton fabric, which is then accented by diagonal ribbons secured with decorative upholstery tacks at each intersection. This arrangement creates a series of secure, diamond-shaped pockets where paper notes, invitations, and photos can be slipped neatly behind the taut ribbons. The visual aesthetic is soft, textured, and highly traditional, making it a perfect addition to bedrooms, nurseries, or classic home entryways.
How to Create
To build this elegant lattice display, begin by cutting a piece of half-inch thick foam insulation board or self-healing cork to your desired dimensions. Cut a matching layer of thin quilt batting and place it over the core, then wrap a solid linen fabric tightly over the batting, pulling it secure to the back panel and stapling it with a staple gun. Lay out your selected satin or grosgrain ribbon diagonally across the front of the fabric, spacing the parallel bands approximately four to six inches apart to form a diamond grid pattern. Where the diagonal ribbons cross, push a decorative brass or silver upholstery tack through the ribbon and deep into the board core, securing it on the backside with a dab of hot glue. Pull the loose ends of the ribbons tightly around the edges of the board and staple them securely to the back frame. Finish the project by mounting the padded board inside a painted wooden picture frame to achieve a clean, polished border.
Idea 2: The Hexagonal Geometric Cork Tile Cluster
Concept and Spatial Layout
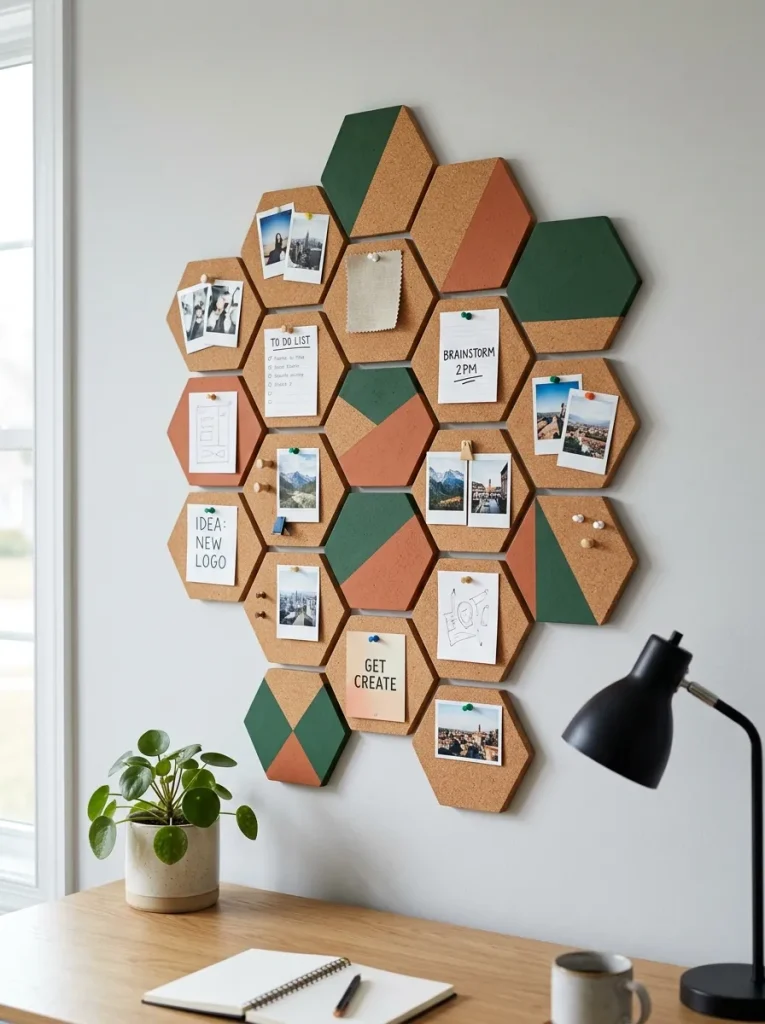
The hexagonal geometric cork tile cluster offers a highly modern, modular approach to wall organization by breaking a traditional single board into small, interlocking shapes. This minimalist style utilizes individual, thick cork hexagons that can be arranged in custom honeycombed patterns, scattered layouts, or linear paths directly across your wall surface. The design emphasizes clean, sharp lines and geometric simplicity, allowing you to paint selective tiles in contrasting colors to create a striking piece of abstract wall art. This layout is exceptionally beginner friendly and highly adaptable for tight wall spaces, odd corners, or offices with modern design themes.
Step-by-Step Guide
Purchase a pack of pre-cut, half-inch thick hexagonal cork tiles, or use a sharp utility knife and a metal template to cut your own shapes from a dense cork sheet. Sand the cut edges of each hexagon with fine-grit sandpaper to ensure the geometric lines are completely crisp and clean. Group the tiles on a flat table to experiment with different interlocking layouts, planning which tiles you want to leave natural and which you want to paint. Use painter’s tape to block off half-sections of selected tiles, then apply two coats of matte acrylic paint in modern shades like forest green, terracotta, or charcoal gray. Once the paint is completely dry, peel away the tape to reveal sharp, clean color-blocked lines across the geometric cork shapes. To install the cluster on your wall, apply heavy-duty, removable mounting tape to the back of each tile, pressing them firmly onto the drywall in your pre-planned pattern.

Idea 3: The Upcycled Vintage Wooden Frame Board
Concept and Spatial Layout
The upcycled vintage wooden frame board transforms an old, discarded picture frame or ornate window sash into a beautiful, functional display with historic charm. This concept focuses on salvaging a high-quality, distressed wooden frame from a thrift store and replacing the old glass pane with a custom-fitted, fabric-covered cork insert. The design style is distinctly rustic, vintage, and full of character, appealing to those who love handmade projects that reuse older materials. This structural board works beautifully in farmhouse-style kitchens, corridors, or living rooms to display family photos and weekly menu planning sheets.
Execution Process
Locate an old wooden frame with structural integrity, and carefully remove the glass backing and old artwork, discarding the broken elements safely. Sand the wooden frame gently to remove any flaking old varnish, then apply a fresh coat of chalk paint or wood stain to highlight the ornate carvings and wood grain. Measure the interior lip of the frame precisely, and cut a piece of half-inch cork board and a matching piece of sturdy corrugated cardboard to fit these dimensions. Lay a piece of textured fabric, such as rustic burlap or washed canvas, over the cork, wrapping the edges tightly around the cardboard backing and securing them with hot glue. Press the fabric-covered cork insert firmly into the back of the refurbished wooden frame, ensuring it sits flush against the interior front lip. Use a staple gun or framing points to lock the backing board securely into the rear of the frame, then attach a heavy-duty wire hanging kit to the wooden sides.
Idea 4: The Frameless Polyester Acoustic Felt Board
Concept and Spatial Layout
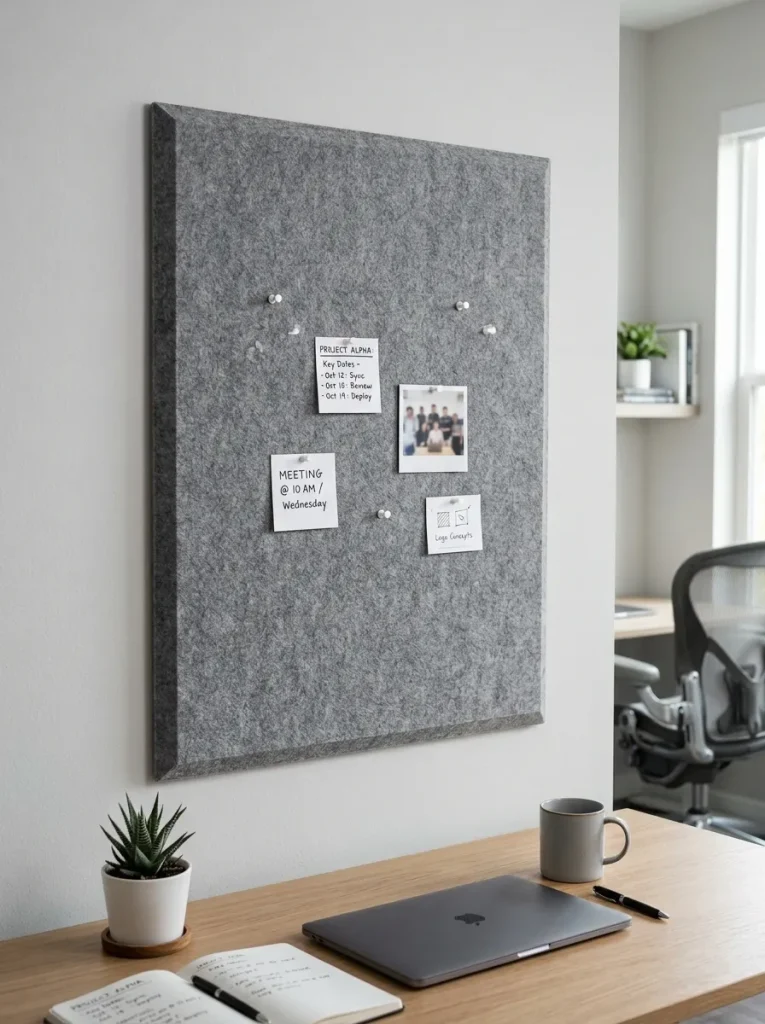
The frameless polyester acoustic felt board leverages modern, industrial materials to create a sleek, ultra-thin organizational surface that also dampens ambient sound in busy home offices. This concept utilizes dense panels made of recycled polyester felt fibers, which feature a beautiful, felted texture that holds push pins without showing holes. The design is completely frameless and minimalist, showcasing clean, bevel-cut outer edges and a modern design that integrates smoothly into contemporary workspaces. The color palette typically focuses on sophisticated neutral tones like heather gray, charcoal, sand, and soft slate blue.
Setup Method
Acquire a large, high-density polyester acoustic felt panel, which is lightweight, self-healing, and easy to clean over long-term daily use. Place the felt panel face down on a clean cutting mat, and use a long metal ruler and a fresh utility knife to cut the panel to your exact target dimensions. To create a professional, high-end appearance, hold your utility knife at a consistent forty-five-degree angle along the outer edges to shave a clean, beveled trim border around the board. Choose whether to mount a single large panel or cut several smaller square panels to arrange in a grid pattern with thin, uniform gaps between them. Apply a generous amount of double-sided industrial mounting adhesive strips across the entire back surface of the felt panels to prevent sagging. Press the panels firmly onto a clean, dry drywall surface, using a level to ensure the geometric grid lines are perfectly straight and square.
Idea 5: The Rustic Herringbone Wood and Cork Mosaic
Concept and Spatial Layout
The rustic herringbone wood and cork mosaic blends the warmth of natural stained timber with the soft texture of cork to create a highly artistic, patterned board. This advanced design uses alternating diagonal strips of thin wood lath and dark cork to form a classic herringbone chevron pattern across a sturdy backing board. The visual effect is highly detailed, rich, and textural, making the board look like a piece of high-end wood paneling even when it is completely empty of notes. This structure is highly functional for living rooms, entryways, or studies where you want your organization board to double as a dramatic piece of home decor.
How to Create
Cut a base panel of quarter-inch plywood to serve as the rigid foundation for your herringbone mosaic pattern. Gather a supply of thin, pliable wood lath strips and thin cork sheets, cutting them all into uniform rectangular tiles measuring two inches wide by six inches long. Sand the wood tiles smooth, and apply a variety of coordinating wood stains, such as honey oak, weathered gray, and dark walnut, to create natural color variations. Beginning in the top center of your plywood base, lay the wood and cork tiles diagonally at alternating ninety-degree angles to establish the first chevron V-shape. Continue gluing the tiles down across the entire board using high-quality wood glue, alternating between stained wood tiles and cork tiles to build a beautiful interlocking mosaic. Once the glue is fully cured, use a circular saw to trim the overhanging tile edges flush with the plywood base. Frame the entire mosaic with clean, square-edged pine trim boards painted black or stained to match.

Idea 6: The Modern Oversized Frameless Linen Board
Concept and Spatial Layout
The modern oversized frameless linen board provides a vast, continuous organizational surface that can span an entire wall section above a desk or workspace. This minimalist style design eliminates the heavy visual border of a traditional wood frame, allowing the soft, organic texture of natural linen fabric to float cleanly on your wall. This layout is exceptionally useful for designers, planners, and remote workers who need to pin up large sheets of paper, blueprints, or inspiration boards without running out of space. The aesthetic is clean, soft, and sophisticated, relying on high-quality textiles in soft neutral tones.
Setup Method
Measure the wall section above your desk, and cut a large sheet of half-inch thick, rigid foam insulation board to match these large, expansive dimensions. To prevent the large foam sheet from flexing or bowing under tension, glue a lightweight wooden frame of one-by-two pine furring strips to the back panel edges using construction adhesive. Lay a high-quality, medium-weight natural linen fabric face down on a clean floor, placing the foam and wood assembly directly centered on top of the textile. Pull the linen fabric tightly over the edges of the board, folding the corners neatly like a gift package, and secure the fabric edge to the wooden rear frame using a staple gun. Space your staples approximately two inches apart along the entire perimeter, pulling the fabric taut to ensure there are no loose wrinkles or sagging areas on the front face. Mount this large, frameless linen panel to your wall studs using heavy-duty flush mount interlocking brackets for a completely secure, flush-to-wall finish.

Idea 7: The Industrial Metal Pegboard and Cork Combo
Concept and Spatial Layout
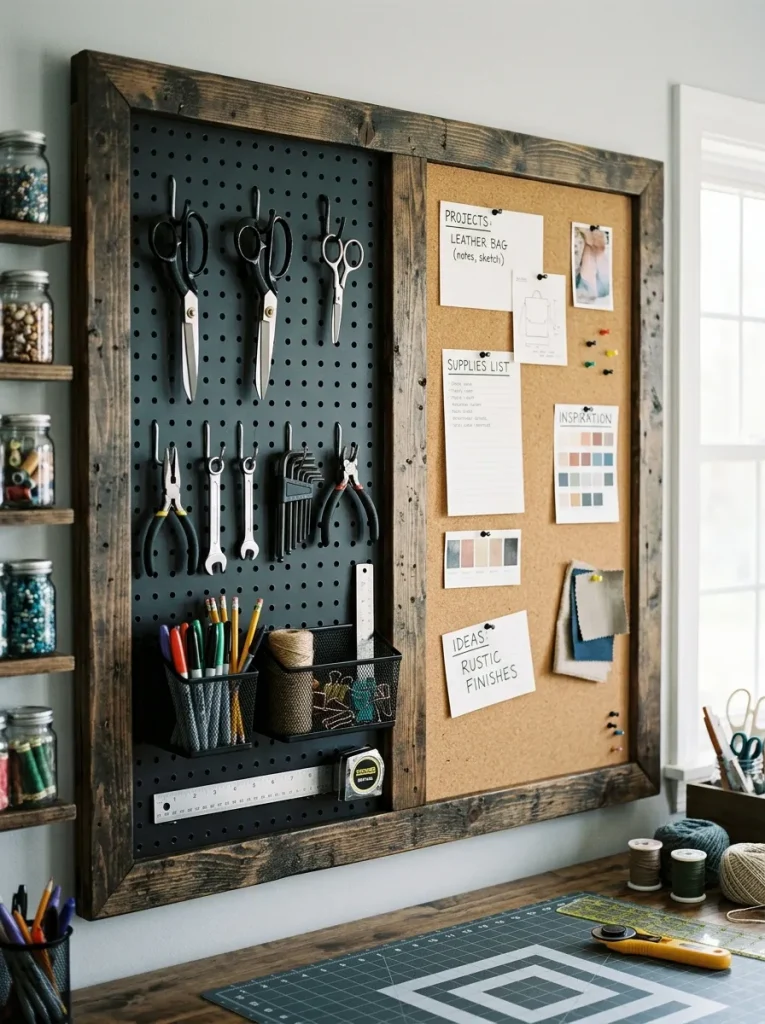
The industrial metal pegboard and cork combo marries two distinct organizational systems into one highly versatile, heavy-duty storage station. This concept splits the board into two functional halves: one side features a durable, perforated metal pegboard for hanging tools, scissors, and metal bins, while the other side features a thick cork panel for pinning paper notes. This hybrid layout is exceptionally useful for craft rooms, garage workshops, sewing spaces, or active family command centers where both utility storage and document pinning are required daily. The design style is modern, industrial, and highly organized, emphasizing metallic finishes paired with natural cork textures.
How to Make
Acquire a standard vertical metal pegboard panel and a matching piece of half-inch thick self-healing cork board of the exact same physical dimensions. Cut a piece of half-inch plywood to act as the single, unified backing plate that will hold both panels side-by-side. Secure the metal pegboard to the left side of the plywood backing using spacer screws, which are necessary to leave a hollow gap behind the metal holes for peg hooks to slide into. Coat the right side of the plywood backing with heavy-duty construction adhesive, pressing the thick cork panel firmly onto the glue and weighted down until fully cured. Apply a coat of matte black or clean white spray paint to the metal pegboard half to coordinate with your room’s color scheme, leaving the cork side natural. Enclose both sections within a single, industrial-style outer frame made of thin aluminum channels or dark stained wood, then mount the entire unit securely into wall studs.

Idea 8: The Circular Scandi-Style Hanging Cork Board
Concept and Spatial Layout
The circular Scandi-style hanging cork board departs from traditional rectangular shapes to introduce soft, organic curves and Scandinavian minimalist style to your wall space. This design features a thick, perfect circle of natural cork suspended from a decorative wooden wall peg by a thick, high-quality leather strap. The visual aesthetic is clean, light, and airy, making it a beautiful accent piece for modern entryways, minimalist bedrooms, or small kitchen nooks. Because of its compact circular layout, this board is best suited for displaying a few select photos, a single calendar sheet, or daily key reminders.
Step-by-Step Guide
Purchase a thick, pre-cut twelve-inch or fourteen-inch circular cork trivet, ensuring the cork is at least three-quarters of an inch thick to prevent push pins from reaching the wall. Sand the circular edge of the cork disk to ensure it is perfectly smooth and free of any crumbling pieces or manufacturing ridges. Cut a length of one-inch-wide genuine brown leather strap, adjusting the length to approximately twenty-four inches to form a hanging loop. Wrap the leather strap around the entire circular perimeter of the cork disk, securing it tightly along the bottom and sides using strong contact cement or decorative brass upholstery nails driven directly into the cork edge. Bring the two loose ends of the leather strap together at the top center of the circle, securing them with a heavy-duty brass rivet to form a clean hanging loop. Install a round, light oak wooden shaker peg into your drywall, and hang the leather-wrapped cork circle gracefully from the peg.

Idea 9: The Chalkboard and Cork Dual-Function Panel
Concept and Spatial Layout
The chalkboard and cork dual-function panel offers a highly practical, split-surface organization station that is perfect for tracking busy household schedules, grocery lists, and school notes. This design combines a smooth, dark slate-like writing surface on one side with a textured, pin-friendly cork surface on the other, enclosed within a single frame. This layout is exceptionally functional for active family kitchens, mudrooms, or children’s study zones where writing quick daily reminders is just as important as pinning permission slips. The visual design is classic, balanced, and structured, fitting easily into traditional and farmhouse home decor schemes.
Execution Process
Cut a piece of sturdy half-inch plywood to your desired overall dimensions, dividing the front surface visually into two equal horizontal or vertical halves. Mask off one-half of the plywood surface using high-quality painter’s tape and protective paper, then apply three thin, even coats of specialty black chalkboard paint to the exposed wood. Allow the chalkboard paint to cure completely according to the manufacturer’s directions, then sand the surface lightly with fine sandpaper to ensure a smooth writing texture. Cut a piece of half-inch thick cork sheet to fit the remaining unpainted half of the plywood board, securing it firmly using a heavy-duty spray adhesive. Remove the painter’s tape and build a clean wooden border around the entire outer perimeter of the plywood board using mitered pine trim pieces. Paint the outer trim a clean white or leave it natural, then install a small wooden ledge or cup at the bottom of the chalkboard side to hold chalk and erasers.
Idea 10: The Artistic Watercolor Painted Cork Canvas
Concept and Spatial Layout
The artistic watercolor painted cork canvas treats the functional bulletin board as a literal artistic canvas, blending organizational utility with beautiful, fluid abstract art. This concept involves using thinned acrylic paints or fabric dyes to create soft, bleeding watercolor wash patterns directly onto a large, light-colored cork sheet before framing. The design style is creative, colorful, and highly expressive, making it an excellent choice for craft rooms, teenager bedrooms, or creative design studios. The artistic paint washes soften the raw, industrial texture of the cork, transforming it into a vibrant piece of home decor that looks attractive even when unpopulated.
How to Create
Select a high-quality, light-colored self-healing cork sheet that features a smooth, tightly compressed grain pattern to ensure even paint absorption. Lay the cork sheet flat on a protective plastic drop cloth, and mist the surface lightly with clean water from a spray bottle to open up the cork pores. Mix several pastel acrylic paint colors with water in small cups until they reach the thin, fluid consistency of traditional watercolors. Use a large, soft watercolor brush to apply the thinned paint washes to the wet cork surface, letting the different colors bleed and blend together naturally to form beautiful abstract gradients. Once you achieve your desired artistic pattern, allow the wet cork sheet to dry completely for twenty-four hours in a flat position to prevent warping. Secure the painted cork sheet to a sturdy hardboard backing panel using spray adhesive, then frame the completed canvas with a modern, thin white frame.

Common Beginner Mistakes and How to Avoid Them
| Crafting Mistake | Potential Structural or Visual Impact | Preventative Action & Solution |
|---|---|---|
| Using Thin Cork Sheets | Push pins strike the hard drywall behind the board, damaging the wall and falling out easily. | Always ensure your core cork, foam, or felt layer is at least half an inch thick to fully absorb standard pin tips. |
| Using Weak Adhesive | Fabric or cork layers bubble, wrinkle, and peel away from the backing board over time. | Avoid standard white school glue; instead, use heavy-duty spray adhesive or contact cement for a permanent, flat bond. |
| Uneven Fabric Tension | Warped wooden backing frames or wrinkled, crooked fabric lines across the board surface. | Pull the fabric taught but not overly tight, stapling in an alternating “North-South-East-West” pattern to distribute tension evenly. |
| Neglecting Drywall Anchors | Heavy wood-framed boards fall from the wall, causing structural damage or physical injury. | Always locate wall studs with a stud finder or use high-quality toggle bolt anchors designed for the weight of your frame. |
Practical Tips for Better Technical Construction Results
Achieving a professional, high-end finish on your DIY pin board requires utilizing precise carpentry methods and smart assembly sequences. When cutting thick self-healing cork or dense foam panels, always use a fresh, sharp utility knife blade and a metal straightedge, making multiple shallow passes rather than trying to force the blade through in a single cut. This practice prevents the edges of the cork from crumbling and guarantees clean, square joints during final framing. To ensure your fabric-wrapped boards maintain crisp, flat corners without bulky fabric lumps, cut a small square diagonal notch out of the fabric corners before folding and stapling them to the back frame. If you are painting geometric patterns on cork, use a credit card or a clean squeegee to press the edges of your painter’s tape firmly into the porous texture of the cork; this simple step prevents wet acrylic paint from bleeding beneath the tape line. Lastly, always apply a clear, light-duty matte protective sealant over painted cork designs to prevent the acrylic colors from transfer-staining onto your white paper notes.
Styling, Presentation, and Wall Organization
Once your handmade memo board is completely assembled and mounted, applying thoughtful styling principles transforms it into an appealing feature that enhances your home decor. Avoid pinning items in a chaotic, overlapping fashion; instead, use a clean grid layout or leave small gaps of open fabric to maintain an organized, serene aesthetic that aligns with minimalist style. Purchase or craft coordinating push pins—such as uniform wooden pegs, sleek brass tacks, or minimalist white clips—to replace cheap, colorful plastic pins that clutter the display visually. Group similar items together by dedicated zones, reserving one corner of your board for immediate calendar deadlines, another for active inspiration, and a separate area for personal photos. If your board features a wooden frame, you can mount a small brass cup or hook to the bottom rail to hold keys, pens, or scissors in an organized, accessible fashion. Placing a small potted houseplant or a desk lamp next to the board helps frame the display, turning your functional workspace wall into an attractive, integrated design zone.
Efficient Budget and Time Planning
Completing a custom bulletin board project can be achieved quickly and economically by utilizing a structured carpentry plan and selecting your building materials resourcefully. A single standard fabric-covered board requires relatively little lumber and fabric, making it an excellent beginner friendly DIY creative project that can be built over a single weekend. Dedicate your Saturday morning session entirely to measuring your wall space, purchasing your materials, cutting the backing boards, and applying your base adhesives. Use the Saturday afternoon window to wrap your fabrics, construct the outer wooden frames, or paint your geometric patterns, allowing all glues and paints to dry completely overnight. Save your Sunday session for the final detailing steps, such as installing the hanging wire, mounting the board to your wall studs, and neatly styling your initial pinned documents. By sourcing cheap materials like thrift-store frames or utilizing fabric remnants from past upholstery projects, you can build a highly durable organization station while keeping your financial planning within a minimal budget.
Creative Expansion and Advanced Inspiration
For experienced DIY builders looking to push their home improvement and decoration skills further, these basic pin board designs can serve as foundations for advanced, custom-built workspace features. You can scale up a standard installation by integrating hidden, low-voltage LED strip lighting channels along the interior lip of a thick wooden frame to cast a soft, ambient wash across your pinned documents. Another advanced option is mounting a sliding track system along your wall, allowing multiple fabric-covered panels to slide smoothly back and forth to reveal a hidden television screen or wall safe behind them. Consider combining different materials in a large-scale wall mural, such as alternating sections of rich, dark cork with panels of magnetic sheet metal and chalkboard vinyl to create the ultimate family organization center. You can also experiment with deep, shadowbox-style frames that incorporate small, recessed shelves at the bottom of the board to display small potted succulents, crystals, or daily office accessories. These advanced upgrades transform simple drywall openings into beautiful architectural statements that add long-term functionality to your living space.
